Tired of your Galaxy? Getting tired of Samsungs unwillingness to update your phone? Then it might be time to consider rooting it. Before you look any closer you should remember that unlocking your bootloader will void your warranty. The risks are slim but they do exist and neither I or anyone else will take any responsibility for any problem that could occur. However you will always loose all your data on the phone! The external SD card will be left untouched.
That was the disclaimer on to more fun stuff! This guide will upgrade your phone firmware and baseband to I7500XEJC6 which is a leaked official (almost) firmware from Samsung. Tool for this is Odin Multi Downloader and this guide should work fine with later versions as well. It’s not as hard as it look, I just wrote a quite extensive guide divided in many steps. My goal is that you should be able to achieve this without any pre-knowledge at all. After that you can choose to continue and install Galaxo 1.6.2 ROM and Recovery 4.6.2 by Drakaz. The recovery image contains a set of tools that can be accessed by booting the phone in recovery mode whilst the ROM is a modification of the actual phone OS that you will boot every day. Read my next post for that here. This is not very hard and you should be good to go in about an hour if the drivers doesn’t give you a very hard time. Note that this guide focus on how to do this on a Windows computer, it’s possible on Mac and Linux but since I don’t have any experience on that I’ll let you look for that answer somewhere else.
Phase 0: Preparations
0.1 Time to get your phone ready, and get the necessary files.
Download Odin Multi Downloader , Firmware and if you like Galaxo Rom and Recovery .
If you already have ADB (Android DeBugging) up and running just skip the driver steps, otherwise keep reading.
0.2 Get the Android SDK from here: http://developer.android.com/sdk/ then unzip it wherever you like. This guide will assume that you unzipped it to c:\android\ to keep it simple.
0.3 Download this very small zipfile and extract the file android_winusb.inf to c:\android\usb_driver\i386 (or if you use a 64-bit windows c:\android\usb_driver\amd64)
0.4 Install Samsung PC studio from the CD that came with your phone (or get it here from Samsung )
0.5 Activate USB debugging on your phone, Settings->Applications->Development->Enable USB debugging
0.6 Connect your phone to your computer, Windows will start to install your drivers but will fail on one device
0.7 Open the Device Manager. Right click on the unknown device and select “Update driver” then “Browse my computer for driver software”
0.8 Choose to search the location c:\android\usb_driver\i386 (or \amd64). Choose to install the driver even though it isn’t signed.
0.9 Time to see how it went, you should now have “ADB Interface->Samsung Galaxy Composite ADB Interface” in your Device Manager. To make it more exiting this isn’t always the case. I used to have it, but not any more. ADB still works though…to be sure Press “Win-button + R” and type in “cmd” then press “Enter”
0.10 In the terminal window that opens type (without the “”) “cd c:\android\tools” and press enter. Then use your very first ADB command by typing “adb devices”. Now you should get a reply that looks something like this:
- Device list example
0.11 If you did get I7500xxxxx, congratulations. ADB is up and running! If you didn’t we have something of a problem on our hands. Could be of several reasons but start with de-select debugging, connect to your computer and mount your SD card. Unplug and redo from step 0.XX. I also added some alternative drivers from Samsung here. Post in comments if you can’t get it to work! There are so many alternative drivers and ways to install them floating around that posting everything here would be impossible. With the first device I tried only the first driver was needed, with the second I installed the second zip as well to get it to work.
******Update******
Just found a new driver…once again. Amazing how hard it can be but several people says that this is it :) Here’s the link
******************
Phase 1: Update your Firmware with Odin Multi Downloader
1.1 Unzip both the Odin and Firmware zip files at any location
1.2 Right-click Odin.exe and choose “Run as administrator”, it’s absolutely necessary that you do it as an admin!
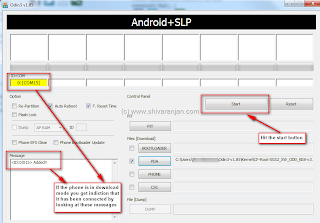
1.3 Start with pointing out the .ops file included in the Odin zip file. If you downloaded the I7500XEJC6 firmware above it should hold 4 different files ending with .tar. Other versions can hold only 1 and is then called a “one package” (note on that below). Point out your corresponding files to BOOT, PHONE and PDA (the CSC file included can be used, some people claimed different benefits from this I tried both without noticing any difference. However that is the localized file for the carrier. This leak is from Russia so before using it you should write down your APN settings and the menu positions to get to the change language options unless you speak Russian :) ) like showed in the picture below.
(If you only got one .tar file just tick the box next to “One Package” and point that file out on the right, ignore the rest.)
1.4 Time to back-up anything you want to save from your phone, search the market for backup and you’ll find many options.
1.5 Shut down you phone and connect it to your computer via USB
1.6 Start your phone in “Download mode” by pressing and holding “Volume down + OK + Power” buttons
1.7 You phone should now say “Downloading…” and show a SD card like icon
1.8 In Odin, look at the white frame on the left, it should say “<1> Added!!!”, “<1> Detected!!!” just like the picture above
1.9 Time to hit that switch! Press Start in Odin and go have a cup of coffee while Odin does it Magic. When finished it will reboot, this could take a couple of minutes
1.10 If it got stuck on the Samsung logo, have no fear. A wipe should get you going. Shut down your phone (pull the battery if you have to) and boot in recovery mode by pressing and holding “Volume down + Answer + Hang up/Power” buttons. When you see the triangle with a ! all you have to do is press the “Menu” button. The phone will perform a Wipe and then restart. Still not working? Start over from step 1.XX – Download mode.
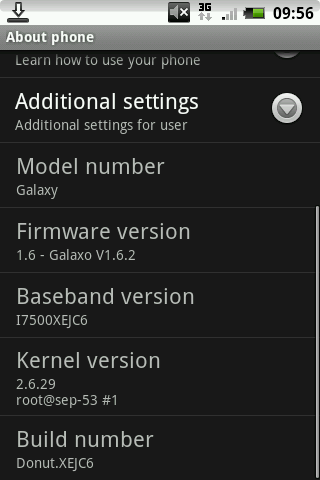
1.11 Perform a wipe as instructed in 1.10 and you’re all done! In Settings->About phone you should now see that Firmware version says something like Galaxy 1.6 and Baseband version says I7500XEJC6. The picture below shows that screen after Galaxo installation.


0 comments:
Post a Comment